Showing posts with label challenge. Show all posts
Thursday, July 07, 2011
July Challenge Card - Calf
Tiffany Doodles July Challenge - All Creatures Great & Small
I kept this card really simple! I used the Calf Digital Stamp on kraft cardstock and colored spots on him with a pink tongue! I made this into a little boy card with the blue gingham ruffle ribbon. The font used is Pupcat. Be sure to visit my Design Team Members sites to see their beautiful cards for this challenge! If you would like to join us for this challenge - get all the deets here.
Thursday, June 23, 2011
June Card for Tiffany Doodles
This is my card for the June Summer Card Challenge at Tiffany Doodles! I used the Watermelon & Crab Digital Stamps for this fun summer card! Both of these stamps are in the $1 Doodle Bowl too!! I colored this card with my Copic markers. This time I did the layout in Photoshop along with the sentiment. Hope you like it! Click the 'Cards' tag to see lots of cards I've made over this past year!
Saturday, April 02, 2011
TD11 - Turquoise Challenge!
Turquoise is my favorite color (besides pink, yellow & periwinkle blue!) So this was a fun challenge to use the various shades of turquoise on this palette here:
You should join us on this challenge and make your own card! There is LOTS of inspiration from out Design Team to inspire you! Check out their cards here.
For my card I used the Clouds set and the Lamb Digital Stamp. It's hard to tell on this photo but the colors came from the palette! This was the first card I have made that I colored completely in Photoshop. I printed out some extra clouds to make them 3d! I lined those with my clear glitter pen. I used my grass punch for the grass! =) Hope you like it and I hope it inspires you to participate in this challenge!
You should join us on this challenge and make your own card! There is LOTS of inspiration from out Design Team to inspire you! Check out their cards here.
For my card I used the Clouds set and the Lamb Digital Stamp. It's hard to tell on this photo but the colors came from the palette! This was the first card I have made that I colored completely in Photoshop. I printed out some extra clouds to make them 3d! I lined those with my clear glitter pen. I used my grass punch for the grass! =) Hope you like it and I hope it inspires you to participate in this challenge!
Monday, March 07, 2011
TD10 Photo Card Challenge
Here is my card for the newest Tiffany Doodles Challenge! It's a photo inspiration challenge and here is the photo! (from pottery barn):
I used the Forsythia & PussyWillow Digi stamp set! I colored with copics and inked the edges with distress ink! I also distressed the edges with my scissors! I hope you like this card and find it inspiring!! =)
Monday, February 07, 2011
Stained Glass Heart!
This month's Tiffany Doodles Challenge starts today! It's now a 2 week challenge with new prizes!! The theme is Valentine's! So join us by making a new Valentine's card and submitting it to the challenge post via InLinkz!
I used the Stained Glass Heart digital stamp for my card and printed on Gina K #80 pure luxury card stock then embossed it with clear, then used water color paints to go for the stained glass look, which did not turn out the way I saw it in my head!! I hand stitched around the edge with blue embroidery thread. I drew sqiggly lines with my metallic jelly roll pens on black card stock! Please join us in this fun card challenge!!
I'd also like a minute to tell you about a few things going on at Tiffany Doodles! I'm sponsoring a few big challenges this month! If you need any creative inspiration - go check this great sites out!!
I used the Stained Glass Heart digital stamp for my card and printed on Gina K #80 pure luxury card stock then embossed it with clear, then used water color paints to go for the stained glass look, which did not turn out the way I saw it in my head!! I hand stitched around the edge with blue embroidery thread. I drew sqiggly lines with my metallic jelly roll pens on black card stock! Please join us in this fun card challenge!!
I'd also like a minute to tell you about a few things going on at Tiffany Doodles! I'm sponsoring a few big challenges this month! If you need any creative inspiration - go check this great sites out!!
- Color Me Creative Classroom - Feb 4 -17
- Embellish Magazine - Feb 4 - 17
- Embellish Magazine - Feb 18 - Mar 3
- Tuesday Morning Sketches - Feb 22 - 27
- Sweet Stamping - Feb 26 - Mar 4
Tuesday, December 07, 2010
TD07 Christmas Challenge!
Here is my card for the Tiffany Doodles Christmas Challenge! I used the Christmas Tree Digi stamp! I colored the tree with copics and added the extra contrast with my prismacolored pencils. The blue background I foamed on with Distress Inks in Broken China and Faded Jeans on the outer edges. I used my white glaze pen to make the snowflakes and dots! I did faux stitching around the edges too! The pink background was sponged on with Distress Ink Spun Sugar and then I stamp a pretty floral background stamp in Memento Rose Bud. I added a pink ribbon and the sentiment is hand-written. Then sentiment didn't turn out as good as it looked on my scratch paper! hehe!
If you are looking for the Blog Hop! Click Here! This is our first challenge with the brand new Design Team and they have got some major eye candy in store for you!! Please go visit their sites to see!!
Saturday, November 06, 2010
2011 Calenders from Tiffany Doodles
I'll start with a reminder for all of my crafty friends out there! Tiffany Doodles is holding an open call for new Design Team members through the month of November. Get all Design Team details here.
November is here and it's time for another Tiffany Doodles Challenge! We are doing something a little different this month! The challenge is to make "anything but a card"! The Tiffany Doodles design team has come up with some amazing creations and you really must check them out! I decided to create a 2011 calender in 2 different styles! 1) a cd case and 2) 1 page trifold. Both using digi stamps from Tiffany Doodles!
I created a PDF template if you would like to make this calender yourself! CD Case Calender PDF template.
For the calender dates I also assembled those in Photoshop and printed on regular copy paper. You can purchase the calender template here and the calender backdrop here. After printing the calender dates I rounded the corners and attached with diamond brads. To change the months simply undo the brads and move the top month to the bottom of the stack, then replace brads. I colored the backdrop with copics in all kinds of colors! Too many to mention, but you get the idea! The back cover contains a shameless plug for anyone that might see your calender and admire it! =) The CD cases came from Papertrey Ink (5 for $3).
Thanks for looking!
November is here and it's time for another Tiffany Doodles Challenge! We are doing something a little different this month! The challenge is to make "anything but a card"! The Tiffany Doodles design team has come up with some amazing creations and you really must check them out! I decided to create a 2011 calender in 2 different styles! 1) a cd case and 2) 1 page trifold. Both using digi stamps from Tiffany Doodles!
CD Case Calender
For the CD case calender I created a backdrop scene using several stamps, Grass, Label, Lamb, Singing Birds, Birdies & Housework, Sunny Face, & Clouds Set. I also used the calf digistamp on the back cover. I assembled the stamps in Photoshop in a document 300dpi, 4.75"x5.4" (or 1425x1620).I created a PDF template if you would like to make this calender yourself! CD Case Calender PDF template.
For the calender dates I also assembled those in Photoshop and printed on regular copy paper. You can purchase the calender template here and the calender backdrop here. After printing the calender dates I rounded the corners and attached with diamond brads. To change the months simply undo the brads and move the top month to the bottom of the stack, then replace brads. I colored the backdrop with copics in all kinds of colors! Too many to mention, but you get the idea! The back cover contains a shameless plug for anyone that might see your calender and admire it! =) The CD cases came from Papertrey Ink (5 for $3).
1 Page Tri-fold Calender
For the 1 page calender I used 9 digi stamps from Tiffany Doodles! Lotus w/Blossom, Zinnia Bloom w/Blossom, Petal Bloom w/Blossom, Hummingbird, Warbler, Warbler 2, Lilystems w/Oval, Dahlia w/Oval, & Poppy w/Oval. This fun little calender will fit on 1 sheet of paper, then you score it, fold it and just flip it every 4 months! This template is available here. I colored all the digis with copics and then gave each one a little extra zing with stickles glitter! I created a PDF template of this calender too! 1 Page Tri-fold Calender PDF tempate.Thanks for looking!
Thursday, October 07, 2010
TD05 - Fall Theme Challenge
Everyone is celebrating the cooler weather these days so for the Tiffany Doodles October challenge we are doing a Fall Theme! For my card I used one of my brand new Fall digital stamps! I drew this little fall tree in Photoshop as I saw it in my head! =) I put it inside the Fall Leaf label (for this card I removed the leaf from the middle of the label). I colored the tree and around the tree with my Copics. Then used my Prismacolor Pencils and deepen some of the blues around the edges. This is the first time I've tried this technique and will definitely do more of this in the future and with different mediums! Hope you like my card this time!! If you enjoy making cards, join us in the fun card challenge and you could win some digital stamps from my store!!
Saturday, August 07, 2010
TD03 Challenge!! Flower Power!
Tiffany Doodles 3rd monthly challenge is underway and this month the theme is "Flower Power"! Tiffany Doodles offers so many beautiful flower digital stamps that the Design Team and I wanted to feature them for our monthly card challenge! For my card I used several of my DoodleBlooms designs! (specifically images from Vol I, IV, V, & VII)
I had a great time putting this card together! Here are my supplies!
Next, I began to color my large doodlebloom with my copics. I really like blending different color families together and making it look smooth. For instance, see how the pink blends into a light orange? And the blue, blends into the turquoise! Green into yellow!! I love this! After I got my Doodle colored the way I wanted it I cut it out with my precision scissors! ALOT of cutting! If there were any touches of white paper showing on the edges I colored them out with a black felt pen. Next, I cut my piece of Black Magic cardstock in the same shape as my doodle with about a 1/4" border. I sanded the edges just a touch to allow the blue core to show through. (LOVE coordinations cardstock!)
Next, I fixed my ribbon onto the card stock and tied the double bow using my Bow Easy! (Best $5.00 I ever spent!) I glued my colored doodle onto the black cardstock and afixed onto the card with large 3d glue zots.
Please join us on this great challenge and make your own card!! You have until the end of August to play! AND you have 4 chances to win up to 7 digital stamps of your choice from Tiffany Doodles!
I had a great time putting this card together! Here are my supplies!
- DoodleBlooms - Tiffany Doodles - Vol I, IV, V, & VII
- Kraft cardstock (papertrey ink)
- Labels 8 (mega nestabilities)
- Coordinations Black Magic cardstock (spellcaster)
- Turquoise ribbon - Hobby Lobby
- Bow Easy
- Prismacolor Pencils - Aquamarine, GrassGreen, Black Grape, Lilac, Mineral Orange, Pink, Mulberry, Canary Yellow, Chartreuse, Dark Green, Kelly Green, Colorless Blender
- Copics - YG21, YG23, YG25, BG05, BG45, BG34, RV25, RV23, RV21, YR02
Next, I began to color my large doodlebloom with my copics. I really like blending different color families together and making it look smooth. For instance, see how the pink blends into a light orange? And the blue, blends into the turquoise! Green into yellow!! I love this! After I got my Doodle colored the way I wanted it I cut it out with my precision scissors! ALOT of cutting! If there were any touches of white paper showing on the edges I colored them out with a black felt pen. Next, I cut my piece of Black Magic cardstock in the same shape as my doodle with about a 1/4" border. I sanded the edges just a touch to allow the blue core to show through. (LOVE coordinations cardstock!)
Next, I fixed my ribbon onto the card stock and tied the double bow using my Bow Easy! (Best $5.00 I ever spent!) I glued my colored doodle onto the black cardstock and afixed onto the card with large 3d glue zots.
Please join us on this great challenge and make your own card!! You have until the end of August to play! AND you have 4 chances to win up to 7 digital stamps of your choice from Tiffany Doodles!
Wednesday, July 07, 2010
Birds & Windows Challenge TD02
Greetings followers and new-comers!! It's time for the 2nd official Tiffany Doodles Challenge!!
The challenge starts today and lasts through the end of the month! You have 4 chances to win up to 7 digi stamps of your choice from Tiffany Doodles!
Now, for my card this month, I used 2 Tiffany Doodles digi stamps! The bluebird and shutters! I assembled the layout in Photoshop. The background photo came from Windows vista (sample photos). I added a generic window sill below the photo. Then added the left & right shutters on top of the photo. If you have looked at my shutter stamp you will see that the shutters not angled and are straight across. I changed the perspective of them by using "transform > perspective" and nudging the inside corners upwards. This made them look like they were open towards the outside. I also added a drop shadow to add more dimension. This is what my layout looked like in Photoshop before printing onto cardstock. ▼
While I was printing, I printed out an additional bird the same size so that I could place 1 on top of the flat one for extra dimension. After I got everything printed, I cut out the layout to fit onto my 4x5.5 card. There was some space left at the bottom to add the wallpaper and sentiment. I colored the shutters with my copics, I used G82 and BG11. I tried to get a mix of blue and green for the old "peeled paint" effect. I cut a piece of paper for the wallpaper and die-cut my small piece for the sentiment and colored it the same as the shutters. Below the window sill I took Copic W3 and drew a line to make it look like a shadow below the sill. I colored the flat bird and the top bird then cut it out and used a 3D glue zot to add dimension. For the curtains, I used 2 pieces of fabric and hand-stitched them at the top with embroidery thread. I tried to gather some pleats in them as I sewed. Then tied them around the middle, then glued them at the bottom in a puffy way. I added the fringe to the top and around mid section of each curtain.
I'd love to see what card you make! Please join us in this really fun challenge! Head over to Tiffany Doodles for all the details!
The challenge starts today and lasts through the end of the month! You have 4 chances to win up to 7 digi stamps of your choice from Tiffany Doodles!
Giveaway Alert:
An extra note for today ....Happy Birthday to me! For my birthday, I would love love love to have 300 (or more) Google followers! If I reach 300 by the end of July, I will choose 7 random followers to win 1 digi each! Sound good?Now, for my card this month, I used 2 Tiffany Doodles digi stamps! The bluebird and shutters! I assembled the layout in Photoshop. The background photo came from Windows vista (sample photos). I added a generic window sill below the photo. Then added the left & right shutters on top of the photo. If you have looked at my shutter stamp you will see that the shutters not angled and are straight across. I changed the perspective of them by using "transform > perspective" and nudging the inside corners upwards. This made them look like they were open towards the outside. I also added a drop shadow to add more dimension. This is what my layout looked like in Photoshop before printing onto cardstock. ▼
While I was printing, I printed out an additional bird the same size so that I could place 1 on top of the flat one for extra dimension. After I got everything printed, I cut out the layout to fit onto my 4x5.5 card. There was some space left at the bottom to add the wallpaper and sentiment. I colored the shutters with my copics, I used G82 and BG11. I tried to get a mix of blue and green for the old "peeled paint" effect. I cut a piece of paper for the wallpaper and die-cut my small piece for the sentiment and colored it the same as the shutters. Below the window sill I took Copic W3 and drew a line to make it look like a shadow below the sill. I colored the flat bird and the top bird then cut it out and used a 3D glue zot to add dimension. For the curtains, I used 2 pieces of fabric and hand-stitched them at the top with embroidery thread. I tried to gather some pleats in them as I sewed. Then tied them around the middle, then glued them at the bottom in a puffy way. I added the fringe to the top and around mid section of each curtain.
I'd love to see what card you make! Please join us in this really fun challenge! Head over to Tiffany Doodles for all the details!
Posted by
Tiffany
at
12:01 AM
16
comments
Labels:
cards,
challenge,
digital stamp,
Tiffany Doodles,
tutorial
Thursday, July 01, 2010
Guess who's Guest Designer at Copic Creations?
Me! Not only am I the Guest Designer, but Tiffany Doodles is also the official sponsor for this July 1 challenge! The theme is "Birds" and each of their Team Members has chosen one of my bird digi stamps to create some beautiful and inspirational cards! Be sure to check out their blog for some inspiration!
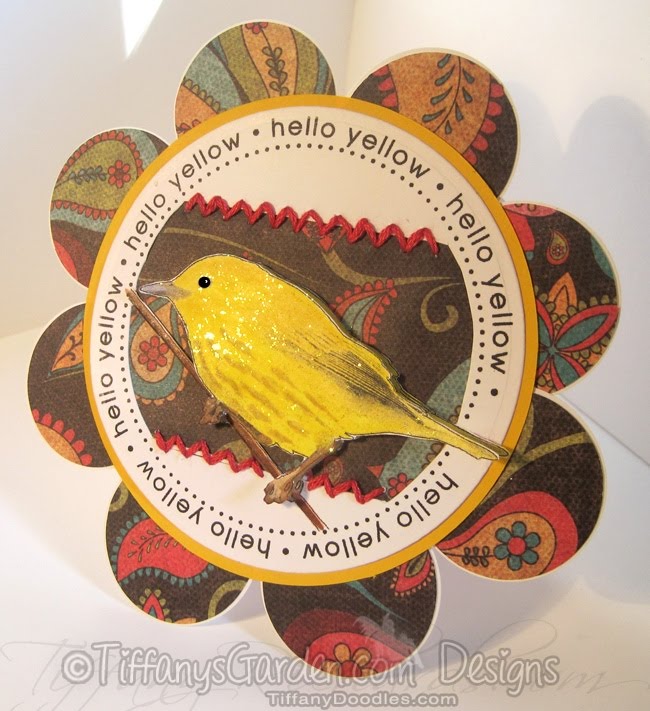
For my card I chose the Warbler 2 stamp and colored this beautiful little guy true to life, bright yellow all over! This is a male yellow warbler and has a few brown streaks on his belly, the females have very faint brown streaks! Yellow warblers are so cute & are often mistaken for 'wild canaries'. They make a beautiful fast chipping call/song that sounds like "sweet-sweet-sweet summer sweet". You could say I'm a bird lover/watcher, and I really enjoy photographing them. You'll find lots of bird digi stamps at Tiffany Doodles with tons more on the way! The sentiment for my card was inspired by my trip to Bath & Body works this past weekend, they are having a "hello yellow" sale! When you walk into the store instead of saying "hello" they say "yellow". Cute.
Here are a few details about my card. I created a 3.75" square document in Photoshop b/c I planned to use my Nestabilities Die Cut (standard large circle set) to cut out a circle around the sentiment. (I used the 3.75" die cut). In photoshop, I drew a circle path and typed my sentiment along the path. Then drew another path and typed a long line of dots around that path. Next, I brought in my digi and pasted it in the middle and resized to fit. You'll notice a small touch of his tail is sticking out over the edge. Before I die cut the circle shape I cut around the very edge of the tail and lifted it over the metal die cut so that the tail wouldn't cut off.
Next, I printed an additional bird in the same size so I could place it on top of the first one to add a little dimension. I colored this bird and cut out with my sharp scissors and smeared on some yellow stickles with my finger. While the birdie was drying his feathers, I did a little stitching with some light red embroidery thread. After sewing the pretty paper to the die cut circle card stock I glued that onto a yellow piece of card stock . Next I punched 1 1/2" circles on white card stock and then glued my pretty paper on top of those for sturdiness. Here is my material list:
Hope you like this card and my little yellow warbler! Check out Tiffany Doodles for more photo realistic birds and drawings.
For my card I chose the Warbler 2 stamp and colored this beautiful little guy true to life, bright yellow all over! This is a male yellow warbler and has a few brown streaks on his belly, the females have very faint brown streaks! Yellow warblers are so cute & are often mistaken for 'wild canaries'. They make a beautiful fast chipping call/song that sounds like "sweet-sweet-sweet summer sweet". You could say I'm a bird lover/watcher, and I really enjoy photographing them. You'll find lots of bird digi stamps at Tiffany Doodles with tons more on the way! The sentiment for my card was inspired by my trip to Bath & Body works this past weekend, they are having a "hello yellow" sale! When you walk into the store instead of saying "hello" they say "yellow". Cute.
Here are a few details about my card. I created a 3.75" square document in Photoshop b/c I planned to use my Nestabilities Die Cut (standard large circle set) to cut out a circle around the sentiment. (I used the 3.75" die cut). In photoshop, I drew a circle path and typed my sentiment along the path. Then drew another path and typed a long line of dots around that path. Next, I brought in my digi and pasted it in the middle and resized to fit. You'll notice a small touch of his tail is sticking out over the edge. Before I die cut the circle shape I cut around the very edge of the tail and lifted it over the metal die cut so that the tail wouldn't cut off.
Next, I printed an additional bird in the same size so I could place it on top of the first one to add a little dimension. I colored this bird and cut out with my sharp scissors and smeared on some yellow stickles with my finger. While the birdie was drying his feathers, I did a little stitching with some light red embroidery thread. After sewing the pretty paper to the die cut circle card stock I glued that onto a yellow piece of card stock . Next I punched 1 1/2" circles on white card stock and then glued my pretty paper on top of those for sturdiness. Here is my material list:
- Warbler Digi Stamp - TiffanyDoodles.com
- Copics: Y08, Y15, E55
- Yellow Stickles
- Nestabilities Standard Circle Small
- Paper - My Minds Eye - Bloom & Grow
- Gina K white card stock
- Embroidery Thread, Needle, Paper Peircer
- 1 1/2" Circle Punch
Hope you like this card and my little yellow warbler! Check out Tiffany Doodles for more photo realistic birds and drawings.
Monday, June 07, 2010
Tiffany Doodles Challenge
Here is the card I made for our first ever Tiffany Doodles Card challenge! The challenges will be every 7th of the month and last through the end of the month!! You have 4 chances to win up to 7 Digis from Tiffany Doodles!! Yeah!
I had so much fun making this cute little card for our first challenge! Here are a few details!
On the digi stamp I erased (in photoshop) the grass that surrounded the bluebird, then I placed the black and white stamp image on top of a photograph of a field of little purple flowers. I then printed it from Photoshop onto Gina K paper and die cut the whole image. Personally, I use photoshop for all things "digi", but this technique (of placing a digi stamp on top of a photo) can also be achieved in Word. (Tutorial coming in just a couple of days).
The challenge this month is a sketch challenge. Jenyfur at Torn Paper was so generous to make this awesome sketch just for us!! Thank you Jenyfur!!
Head over to Tiffany Doodles right now to join in the challenge!
I had so much fun making this cute little card for our first challenge! Here are a few details!
- Bluebird in Grass Digi Stamp - TiffanyDoodles.com
- Green Paper at the bottom - Basic Grey, Lime Ricky
- Dark Blue paper - Coordinations
- Turquoise card - Coordinations
- GinaK 80# paper - for printing the digi image
- White Ribbon - Hobby Lobby (colored with copics V15 & V06)
- Flower punch - Martha Stewart, Hydrangea
- Sentiment - Paper Studio
- Nestabilities Die Cut
- Silver dots - Mark Richards
On the digi stamp I erased (in photoshop) the grass that surrounded the bluebird, then I placed the black and white stamp image on top of a photograph of a field of little purple flowers. I then printed it from Photoshop onto Gina K paper and die cut the whole image. Personally, I use photoshop for all things "digi", but this technique (of placing a digi stamp on top of a photo) can also be achieved in Word. (Tutorial coming in just a couple of days).
The challenge this month is a sketch challenge. Jenyfur at Torn Paper was so generous to make this awesome sketch just for us!! Thank you Jenyfur!!
Head over to Tiffany Doodles right now to join in the challenge!
I'm a self-employed web designer & photographer since 1998. But that's all business and this blog is all about my crafty hobbies! Throughout this blog you will find things like watercolor painting, paper crafting, stamping, card-making, copics, my own hand drawn digital stamps, beading, cooking, gardening, photography, photoshop, the antics of my 4 legged children, Emma & Francie!


Sign up with your email and I'll let you know everytime I add a new digital stamp, photo, paper craft, or painting! Don't forget to click the link inside your sign up email from Feedburner to complete the subscription!