Tiffany's Garden Homepage Sewing Tutorials Tiffany's Garden Copics Templates Contact Tiffany
Blog Biz Cards Studio Organization Tiffany's Beading & Jewelry Gardening Watercolor Painting by Tiffany Emma and Francie Shih-Tzu

Saturday, December 12, 2009

Bluebird & Azaleas Painting!

It's been a while since I got out my watercolors and painted something, but I had a really good reason to blow the dust off the ol' watercolor palette.  I asked Granny what she wanted for Christmas and she said she wanted a bluebird to match the Cardinal I painted her a while back.  I'm able to share this with you b/c there is no chance of Granny seeing this before Christmas!  Needless to say Granny doesn't get on the internet!
I painted this bluebird in a summer scene!  I love fuchsia azaleas and can't wait for spring to get here!

Friday, December 11, 2009

A Wedding Gift Box!

A friend of mine got married last month and I made this pretty little keepsake box for her, a matching card, and diamond trimmed mini photo frames (from Hobby Lobby).


Here are the ingredients for the card,
  • Aqua Mist cardstock - Papertrey Ink
  • White cardstock - Gina K Pure Luxury 80#
  • Faded text background stamp - Stampabilities
  • Aqua Mist ink - Papertrey Ink
  • Nestabilities square scallop die cut
  • Round Monogram stamp - 1-5/8" JustRite
  • Silver Dots - Mark Richards
  • Glasses stamp & sentiment - TPC Studio - Elegant Greetings
  • Scallop border punch - EK success
  • Clear 3D laquer (on glasses)
  • Angel Pink Ink - Memento
  • Silver embossing powder
  • Versamark pen


For these 2 cute litte frames I used the Aqua Mist cardstock and Justrite monogram stamp and my versamark ink pad to emboss their initials. I really intended this to be a nice placeholder instead of the image that came with the photo. She can keep it or put a nice wedding pic in it's place!


I printed these 3 words on my computer and used a sponge dauber to fill in with Aqua mist ink around the edges and Memento Angle Pink in the center.  Then embossed with silver on the little tweely.

 
The cardboard box came from Hobby Lobby.  I used a little wedding pack of embellishments (can't remember the brand).  I used PTI dot paper and some plain pink paper to wrap the box.  I used pink ribbon on the lid edge.  Somehow I didn't get a good shot of the sides of the box.  But I cut a label and stamped each side with a different shell stamp (from Flourishes) and embossed with silver and inked the edges with Aqua Mist, then used a silver dot on each end!

The cake was stamped onto Gina K cardstock with versamark ink.  (Cake stamp & sentiment - Paper Studio - from Hobby Lobby).  I embossed with silver and filled in with copics.  I cut it out and used pop dots to stick on top of pink label.  I also embossed the sentiment with silver.

The dress is part of the embellishment pack.  I went around the edges with Scribbles 3D paint in Shiny True Pink (walmart).
PS. sorry for the bad photo quality. 

Thursday, December 10, 2009

I won a stamp set!!

Yeah!! I have never won something like this before! I'm so excited!  This is a brand new stamp set from Flourishes that has not been released yet!  I just love their stamp designs!  I can't wait to get it in the mail!
Visit their store to see all of their beautiful stamps!  Thank you ladies!!  You made my day! 

Tuesday, December 08, 2009

4x6 Box Template!

I have something to share with you today!  While crafting all of my Christmas goodies I found myself needing a box.  After searching for a while and not finding exactly what I needed I figured I'd just make one from scratch.  After a little work I came up with this template.  It's a 4x6 box 1" deep. I'll update this post to share photos after Christmas!  Below is a snapshot of the template made for 8.5x11 paper.  Here is the download link.... 4x6 Box Template by Tiffany Richards!  (Zip file contains .pdf & .png files)  PS. This is my first template!! =)  So, if I've made any mistakes please let me know so I can fix 'em up!!  See what I made with this box!!


I hope you find some use for it!  If you use if for anything, send me a pic and I'll post it to my blog!! =)

Monday, December 07, 2009

Been Busy Crafting!

I feel so bad for not having posted much lately, but I wanted you to know that I'm busy with lots of fun stuff up my sleeve! I'll be able to share some of it soon! But, some of it will have to wait til after Christmas b/c I'm crafting Christmas presents for my loved ones and they all read my blog! So you can see my perdicament (sp?)! =)

I thought I would share a few pictures I came across from last Christmas 2008 ...
This first photo is my 11' tree from last year!  It was Christmas everywhere you looked in my house last year! There wasn't one thing un-decorated!  Technically 2008 was our second Christmas in the cabin, but the first one with us living in it fully furnished and all.  2007 we were there but only had that red furnace and a blow up bed!


I made this yummy garlic cheese spread and then shaped it with my hands and stuck sliced almonds in to look like a pinecone, then finished it with rosemary sprigs!


This is me and my 3 girls!  From left to right; Emma (4 yrs), Isabelle (10 yrs), Francie (4 yrs)


While the family was there we grilled out and the girls got to have a little fun too! I let them really have at it for a few minutes, but I didn't want them to mess up their pretty Christmas dresses!! =)


Emma was really into it!  She did not want to let go!! =)


Saturday, November 28, 2009

Gift Box for Mary!

My wonderful stepmom, Mary, just had a birthday so I made her one of my favorite little paper templates. The little 3" gift box. It is so quick and simple!


Inside the box I put a small gift, a photo of her new grandson, Owen!


The steps to creating this box are very simple.  Here is the template for the box. Use your score-pal to make the folds.


Then I stamped a tree image on the same patterned paper I used for the top of the box. You can either use your versamark inkpad or go over it with your versamark pen like I did. Then I sprinkled blue embossing powder over and heat set it. I used my awesome swivel craft knife to cut the tree out.

Next, I stamped a little scene with the supplies you see below.

For the top of the box, I used my nestabilities and die cut 2 shapes. I stamped a flower image with my versamark inkpad and embossed it with the same blue powder. I also stamped her name and added some pink stickles.
 
Then I assembled everything with my score tape and wrapped the little frame in tissue paper and gave it to her! She liked it a bunch!

Wednesday, November 25, 2009

Happy Thanksgiving!

It's been a while since I've posted and I'm sorry, but I have some really cool stuff in the pipeline that you'll get to see very soon!  I'm so excited to share it with you and I can't wait!  I'm working on 3 paper projects that you will get to see very shortly after Thanksgiving!  Then after the first of the year there will be a **big** surprise!
So for now, I wanted just to take a little minute to say Happy Thanksgiving!  Here is a pic of our (not so little, 17lb) kitty, Cornbread, sitting by the front porch!  He's our yellow coon!


See you after Thanksgiving!!  Meow!

Friday, October 23, 2009

Photoshop Tutorial - Turn a photo into Line Art for a digital stamp image

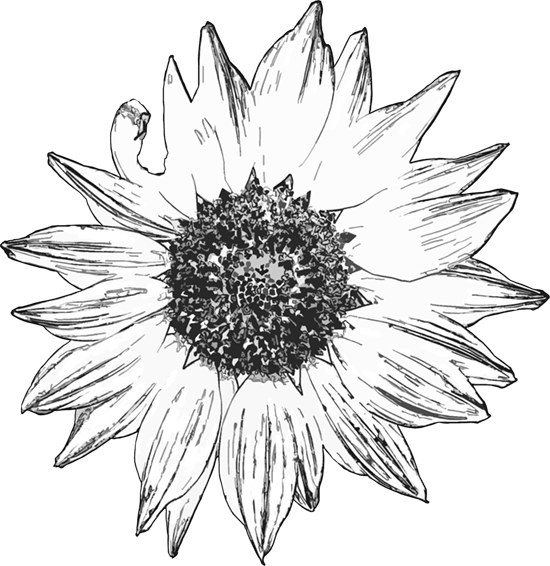
Make digital stamps (line art) from your own photographs! This is my first try at making a tutorial. I hope ya'll get some use out of it! Let me know!! =) I used one of my own images! =)

photoshop line art tutorial - BEFOREphotoshop line art tutorial - AFTER

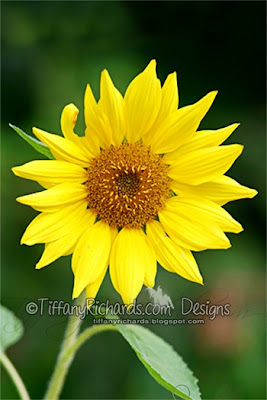
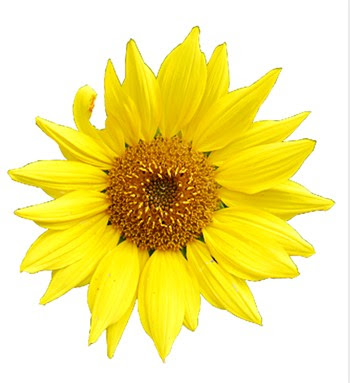
For this tutorial I'm using Photoshop CS3, but this lesson should work with most any version b/c it uses basic tools and filters. (I'm not sure about Photoshop Elements b/c I've never used it) This tutorial can work on most any type of photo, depending on what type of digital image you want to achieve. You can either isolate an object from a photo (like below) or, use the entire photo as a "scene" for a digital stamp image.

1. Let's start by isolating your object from the background of the image. Use your pen tool to create a new work path and select your object.


If you need help using the pen tool do a google search for a pen tutorial. Depending on your image there are other ways of selecting your object; such as selecting by color range. I find it easier to zoom in really close to select your image with the pen tool. Use your space bar to pan around the image as needed. Depending on the detail of your image this step could take a while, but will be worth it in the end! Here you can see my selection path!


2. After you have selected your object (by connecting the last dot to the first dot!) Then 
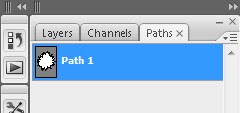
Save Your Selection as a New Path by dragging your "new path" on the palette down to the "create new path" icon at the bottom of your Path palette. It will name itself Path 1.


3. Next, 
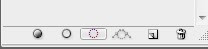
Convert Your Path to a Selection by clicking the dotted circle icon at the bottom of your palette.


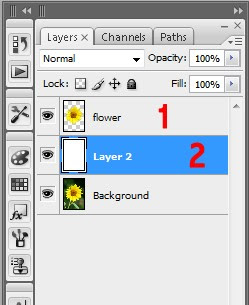
4. Then go back to your layers palette and hit "cmd/ctrl J" to duplicate your selection.

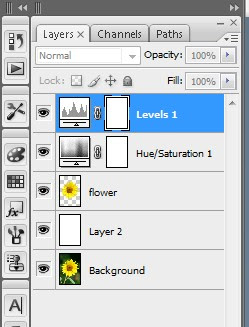
Name this layer "flower". (1)

Then create a new layer below the flower layer and fill with white. (2)


5. Now, you need to desaturate your image, that means remove all the color. At the bottom of your layers palette click the New Adjustment Layer icon (the half full moon). Click "Hue/Saturation" and slide the Saturation slider all the way to the left. This will make your image look black and white.
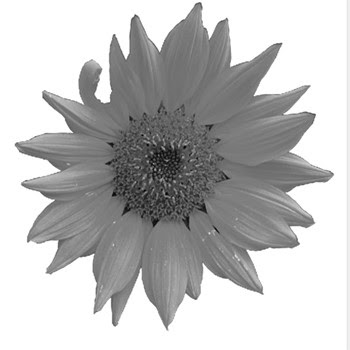


6. Your image may seem rather flat, so lets Add Another Adjustment Layer with levels to increase the contrast. Selects "Levels".


On the levels dialogue box the left black slider represents your shadows. The right white slider are your highlights. The middle grey is for your midtones.

I moved my shadows closer in to where the shadow information starts on the scale. I did the same with the highlights moving to the left.


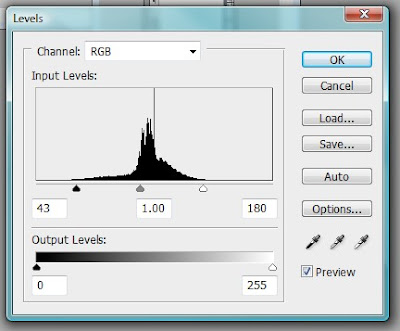
Look at your own image and decide what looks best.


This will make better end results with the boost in contrast.

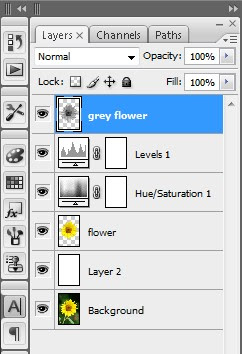
7. Let's put this new grayscale image on it's own new layer.

Hold Cmd/Ctrl and hit your flower layer and that will automatically select what you have on that layer.

Then do a Cmd/Ctrl + Shift + C and copy merge everything that is selected.

Then do a Cmd/Ctrl + V and paste and it will automatically paste onto a new layer. Be sure it is above all other layers.

You can name this new layer: "gray flower" or whatever you would like!! Your Layer palettes should look something like this:


Okay, lets start making this thing look like a stamp!! Now the real fun begins!

8. While you are still on the "gray flower" layer apply the "Smart Blur" filter.

Filter>Blur>Smart Blur

Set the Quality to High and the Mode to Edge Only.


These are the settings I used (above). You adjust your settings to fit your own image. Watch your image as you move the sliders.


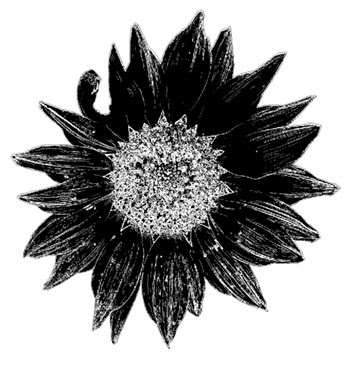
Looking cool, huh? Now let's invert the image!

9. While still on the "gray flower" layer go to Image>Adjustments>Invert


Eeewww, groovy baby!! Stay on that gray flower layer, don't leave it yet!

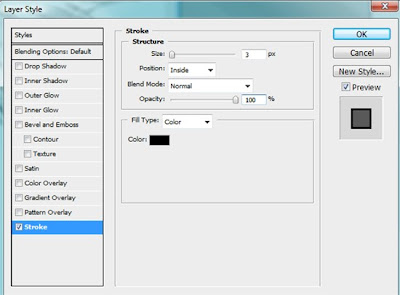
Now, let's apply a black stroke to the flower!

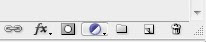
10. Click on your Layer Styles icon at the bottom of your layers palette. (fx)


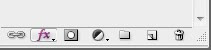
I used these settings below, but you adjust for your image!


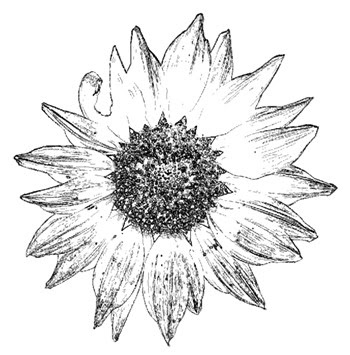
Getting closer! Now let's define the edges just a little bit more! (still on the gray flower layer).

11. Filter>Artistic>Poster Edges


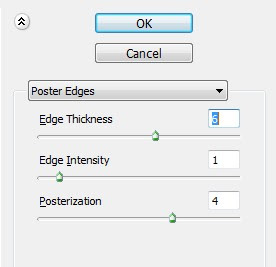
Nice! Now let's go the extra mile and make it awesome!

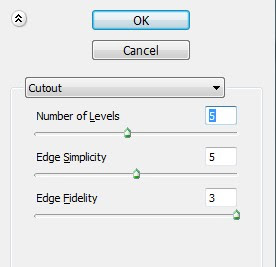
12. Let's apply the Cutout filter: Filter>Artistic>Cutout

These were my settings but you adjust for your image!

Remember every single image you ever do will be different!


Don't worry if you see lots of jiggly lines everywhere.

You can just erase them by using a white paintbrush (on a new layer in case you mess up!)

Tweak it as much as you want to!
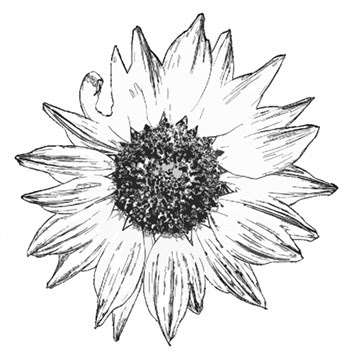
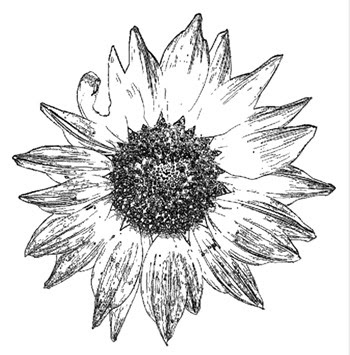
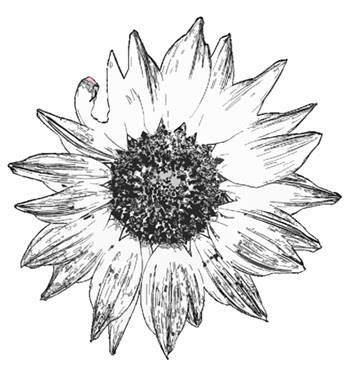
Finished Image:

Enjoy this image for free! Download the full size PNG here. (Right click and "save target as")

I hope you learn something from this tutorial! I'll be doing more photoshop tutorials in the near future so stay tuned to my blog!

I would LOVE to hear your feedback on this tutorial and also to see what you have done with it. It will boost my confidence to make another one!! =) **grin**

Related Posts with Thumbnails
 
TiffanyRichards.com ShabbyPrincess.com