











Tiffany's Garden Homepage Sewing Tutorials Tiffany's Garden Copics Templates Contact Tiffany
Blog Biz Cards Studio Organization Tiffany's Beading & Jewelry Gardening Watercolor Painting by Tiffany Emma and Francie Shih-Tzu
Showing posts with label cards. Show all posts

Wednesday, September 07, 2011

Halloween Card Tutorial

The Card Challenge at my other site Tiffany Doodles for this month is Stitching!  I l-o-v-e stitching on my cards so I had a lot of fun with this project!  I used the brand new Spooky Pumpkins Digital Stamp set for this tic tac toe card!

To start this project, I layed out my design in Photoshop in a 4"x4" document (300dpi)  I filled the background with a very dark gray.  I then created nine 1" boxes and filled them with a lighter gray.  Then I opened each pumpkin digi and insert them into the document.  I used the Transform tool to resize them to fit into each box.  Since there are only 8 digis in the set, I duplicated 1 of them and flipped it horizontally.  Do you see which pumpkin has a twin?  (my printer was acting up and put a dark line through a few of the boxes so I didn't mean for that to be there.)


Next I cut out a 4" square piece of cardstock - I used Coordinations "spellcaster" textured cardstock.

I turned my cardstock over and need to draw my guides for cutting out the 1" square holes in the cardstock.  So to be precise I lined up my cardstock even with the image and used a ruler as my guide.

Then I cut out my 1" square with my exacto blade.... be careful!

Got everything cut out for my windows!

Next I used my little doodlebug hole maker and ran it down all rows of my cardstock.  It doesn't actually pierce the paper but it makes a little indention so that I can use it as a guide for making good holes.  I used my paper piercer and a little hammer to tap all the holes.

Next I used a piece of orange paper and my scallop edger to make pretty sides.  I made it just a smidge bigger than my 4" cardstock window.

Then I used my autumn leaves ink pad and inked the edges of my actual card backing, all 4 sides.

I then glued down my orange paper onto the kraft card b/c I'm going to need to sew through both pieces at the same time!

But first I punched all my holes!

I also colored all the pumpkins with my colored pencils!  After I colored them in I took my black fine tip pen and went around and over all the lines of each pumpkin.  Makes them stand out much more!

Here is a close up of the colored pencils I used.

Next comes the stitching!  I used 3 strands of orange embroidery thread and did the back stitch on every row!

I thought my pumpkins needed a little more dimension so I took a almost black marker (N7) and made a little shadow below each pumpkin.

Then I sewed french knots on each scallop of the orange paper! I love making french knots!!  I used 4 strands of embroidery black thread and 3 loops for the french knots! =)

I then glued down the black cardstock window onto the pumpkin digi paper and assemble the card!! I hope you like this tutorial!!  I would love to hear your thoughts!

Thursday, July 07, 2011

July Challenge Card - Calf


Tiffany Doodles July Challenge - All Creatures Great & Small
I kept this card really simple!  I used the Calf Digital Stamp on kraft cardstock and colored spots on him with a pink tongue!  I made this into a little boy card with the blue gingham ruffle ribbon.  The font used is Pupcat.  Be sure to visit my Design Team Members sites to see their beautiful cards for this challenge!  If you would like to join us for this challenge - get all the deets here.

Thursday, June 23, 2011

June Card for Tiffany Doodles

This is my card for the June Summer Card Challenge at Tiffany Doodles! I used the Watermelon & Crab Digital Stamps for this fun summer card! Both of these stamps are in the $1 Doodle Bowl too!! I colored this card with my Copic markers. This time I did the layout in Photoshop along with the sentiment. Hope you like it! Click the 'Cards' tag to see lots of cards I've made over this past year!

Saturday, April 02, 2011

TD11 - Turquoise Challenge!

Turquoise is my favorite color (besides pink, yellow & periwinkle blue!)  So this was a fun challenge to use the various shades of turquoise on this palette here:
You should join us on this challenge and make your own card!  There is LOTS of inspiration from out Design Team to inspire you!  Check out their cards here.
For my card I used the Clouds set and the Lamb Digital Stamp.  It's hard to tell on this photo but the colors came from the palette!  This was the first card I have made that I colored completely in Photoshop.  I printed out some extra clouds to make them 3d!  I lined those with my clear glitter pen.  I used my grass punch for the grass! =)  Hope you like it and I hope it inspires you to participate in this challenge!

Monday, March 07, 2011

TD10 Photo Card Challenge

Here is my card for the newest Tiffany Doodles Challenge! It's a photo inspiration challenge and here is the photo! (from pottery barn):
I used the Forsythia & PussyWillow Digi stamp set!  I colored with copics and inked the edges with distress ink! I also distressed the edges with my scissors!  I hope you like this card and find it inspiring!!  =)

Wednesday, March 02, 2011

Journal Sets 1 & 2

2 new journal sets have been released at Tiffany Doodles! I made a card here with one of them! I used Journal Set 2

Something to Sing About!

Another new spring release from Tiffany Doodles! This Cheery Bird Digital Stamp Set comes with 4 different birds plus the sentiment!!  (In my card I used the same bird 3 times!)

Thursday, February 24, 2011

My Special Valentine Card!

I made this cute little card for my Valentine! ;-)

Monday, January 24, 2011

Angel Trumpet Card!

To celebrate the Sneak Peak of 3 new sets of flowers I made this pretty Angel Trumpet Card, the first of 3 releases! Tune in tomorrow at Tiffany Doodles to see the 2nd sneak peak! These new beauties will be in the store on Friday!! Visit the other design team members to see their cards!

Friday, January 07, 2011

January Card Challenge for Tiffany Doodles

I was so excited to finally use this cute little sleeping fawn digital stamp that I drew a while back!  This little guy just melts me!!  He's so cute hiding in the grass!  Here are a few of my supplies I used to make this card!

  • Sleeping Fawn Digital Stamp - Tiffany Doodles
  • Spellbinders Die Cut - Labels 10
  • Grass Border Punch - Fiskars
  • White Glaze Pen - Sakura
  • Distress Ink - Tim Holtz (Tumbled Glass, Broken China, Faded Jeans, Dusty Concord)
  • Sleep Tight Sentiment - Handwritten by me!! =)
  • Striped Ribbon - The Paper Studio
  • Paper Bow - Hot Off the Press Fold It Bows Template
  • Copics - (for Fawn) E31, E34, E35, E37

Be sure to visit the other girls sites and see their beautiful cards this month! Also, enter your card in this sketch challenge! It's easy to enter and you have 4 chances to win up to 7 digital stamps from my BRAND NEW STORE! Here is the sketch so you can play along!  Here is the link for more info on this challenge!

Tuesday, December 07, 2010

TD07 Christmas Challenge!

Here is my card for the Tiffany Doodles Christmas Challenge!  I used the Christmas Tree Digi stamp!  I colored the tree with copics and added the extra contrast with my prismacolored pencils.  The blue background I foamed on with Distress Inks in Broken China and Faded Jeans on the outer edges.  I used my white glaze pen to make the snowflakes and dots!  I did faux stitching around the edges too!  The pink background was sponged on with Distress Ink Spun Sugar and then I stamp a pretty floral background stamp in Memento Rose Bud.  I added a pink ribbon and the sentiment is hand-written.  Then sentiment didn't turn out as good as it looked on my scratch paper!  hehe!
If you are looking for the Blog Hop! Click Here!  This is our first challenge with the brand new Design Team and they have got some major eye candy in store for you!!  Please go visit their sites to see!!

Thursday, October 07, 2010

TD05 - Fall Theme Challenge

Everyone is celebrating the cooler weather these days so for the Tiffany Doodles October challenge we are doing a Fall Theme! For my card I used one of my brand new Fall digital stamps! I drew this little fall tree in Photoshop as I saw it in my head! =) I put it inside the Fall Leaf label (for this card I removed the leaf from the middle of the label).  I colored the tree and around the tree with my Copics.  Then used my Prismacolor Pencils and deepen some of the blues around the edges.  This is the first time I've tried this technique and will definitely do more of this in the future and with different mediums!  Hope you like my card this time!!  If you enjoy making cards, join us in the fun card challenge and you could win some digital stamps from my store!!

Saturday, August 07, 2010

TD03 Challenge!! Flower Power!

Tiffany Doodles 3rd monthly challenge is underway and this month the theme is "Flower Power"!  Tiffany Doodles offers so many beautiful flower digital stamps that the Design Team and I wanted to feature them for our monthly card challenge!  For my card I used several of my DoodleBlooms designs! (specifically images from Vol I, IV, V, & VII)

I had a great time putting this card together!  Here are my supplies!
  • DoodleBlooms - Tiffany Doodles - Vol I, IV, V, & VII
  • Kraft cardstock (papertrey ink)
  • Labels 8 (mega nestabilities)
  • Coordinations Black Magic cardstock (spellcaster)
  • Turquoise ribbon - Hobby Lobby
  • Bow Easy
  • Prismacolor Pencils - Aquamarine, GrassGreen, Black Grape, Lilac, Mineral Orange, Pink, Mulberry, Canary Yellow, Chartreuse, Dark Green, Kelly Green, Colorless Blender
  • Copics - YG21, YG23, YG25, BG05, BG45, BG34, RV25, RV23, RV21, YR02
To start out I created a 4x6 300dpi image in Photoshop and brought in some of my Doodleblooms and arranged them around, resized, & rotated them to make a nice background my my card.  I printed this out onto my Kraft cardstock.  I scored the fold and then used my large die cut to cut the card shape.  (Don't forget to leave the top of the card off so that you don't cut it).  Next I colored all the little doodles with my colored pencils.  This was fun blending the colors together!  I wanted them to be bright and cheerful for our Flower Power theme!
Next, I began to color my large doodlebloom with my copics.  I really like blending different color families together and making it look smooth.  For instance, see how the pink blends into a light orange?  And the blue, blends into the turquoise!  Green into yellow!! I love this!  After I got my Doodle colored the way I wanted it I cut it out with my precision scissors!  ALOT of cutting!  If there were any touches of white paper showing on the edges I colored them out with a black felt pen.  Next, I cut my piece of Black Magic cardstock in the same shape as my doodle with about a 1/4" border.  I sanded the edges just a touch to allow the blue core to show through. (LOVE coordinations cardstock!)
Next, I fixed my ribbon onto the card stock and tied the double bow using my Bow Easy! (Best $5.00 I ever spent!)  I glued my colored doodle onto the black cardstock and afixed onto the card with large 3d glue zots.
Please join us on this great challenge and make your own card!!  You have until the end of August to play!  AND you have 4 chances to win up to 7 digital stamps of your choice from Tiffany Doodles!

Wednesday, July 07, 2010

Birds & Windows Challenge TD02

Greetings followers and new-comers!! It's time for the 2nd official Tiffany Doodles Challenge!!
The challenge starts today and lasts through the end of the month! You have 4 chances to win up to 7 digi stamps of your choice from Tiffany Doodles!

Giveaway Alert:

An extra note for today ....Happy Birthday to me! For my birthday, I would love love love to have 300 (or more) Google followers! If I reach 300 by the end of July, I will choose 7 random followers to win 1 digi each! Sound good?


Now, for my card this month, I used 2 Tiffany Doodles digi stamps!  The bluebird and shutters! I assembled the layout in Photoshop.  The background photo came from Windows vista (sample photos).  I added a generic window sill below the photo. Then added the left & right shutters on top of the photo.  If you have looked at my shutter stamp you will see that the shutters not angled and are straight across.  I changed the perspective of them by using "transform > perspective"  and nudging the inside corners upwards.  This made them look like they were open towards the outside.  I also added a drop shadow to add more dimension.  This is what my layout looked like in Photoshop before printing onto cardstock.  ▼
While I was printing,  I printed out an additional bird the same size so that I could place 1 on top of the flat one for extra dimension. After I got everything printed, I cut out the layout to fit onto my 4x5.5 card.  There was some space left at the bottom to add the wallpaper and sentiment.  I colored the shutters with my copics, I used G82 and BG11.  I tried to get a mix of blue and green for the old "peeled paint" effect.  I cut a piece of paper for the wallpaper and die-cut my small piece for the sentiment and colored it the same as the shutters.  Below the window sill I took Copic W3 and drew a line to make it look like a shadow below the sill.  I colored the flat bird and the top bird then cut it out and used a 3D glue zot to add dimension.  For the curtains, I used 2 pieces of fabric and hand-stitched them at the top with embroidery thread.  I tried to gather some pleats in them as I sewed.  Then tied them around the middle, then glued them at the bottom in a puffy way.  I added the fringe to the top and around mid section of each curtain.
I'd love to see what card you make! Please join us in this really fun challenge! Head over to Tiffany Doodles for all the details!

Thursday, July 01, 2010

Guess who's Guest Designer at Copic Creations?

Me! Not only am I the Guest Designer, but Tiffany Doodles is also the official sponsor for this July 1 challenge! The theme is "Birds" and each of their Team Members has chosen one of my bird digi stamps to create some beautiful and inspirational cards! Be sure to check out their blog for some inspiration!


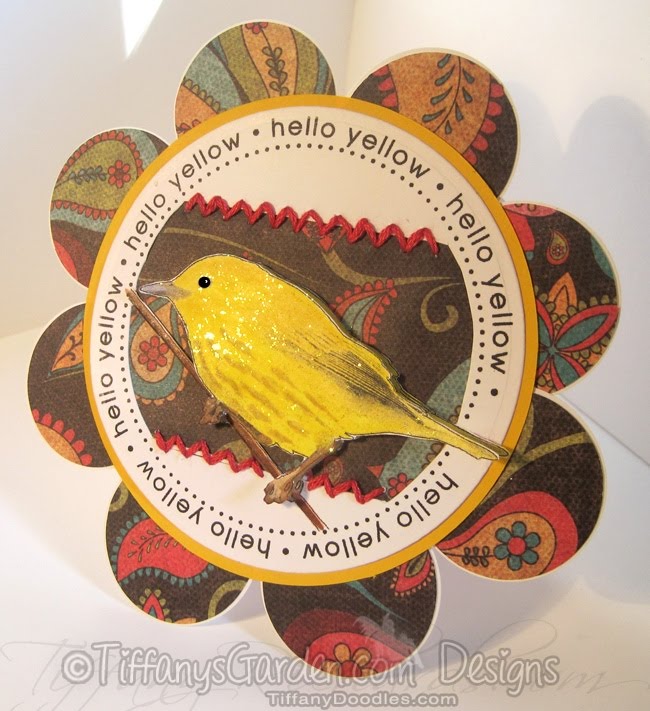
For my card I chose the Warbler 2 stamp and colored this beautiful little guy true to life, bright yellow all over! This is a male yellow warbler and has a few brown streaks on his belly, the females have very faint brown streaks! Yellow warblers are so cute & are often mistaken for 'wild canaries'.  They make a beautiful fast chipping call/song that sounds like "sweet-sweet-sweet summer sweet".  You could say I'm a bird lover/watcher, and I really enjoy photographing them.  You'll find lots of bird digi stamps at Tiffany Doodles with tons more on the way!  The sentiment for my card was inspired by my trip to Bath & Body works this past weekend, they are having a "hello yellow" sale!  When you walk into the store instead of saying "hello" they say "yellow".  Cute.

Here are a few details about my card.  I created a 3.75" square document in Photoshop b/c I planned to use my Nestabilities Die Cut (standard large circle set) to cut out a circle around the sentiment.  (I used the 3.75" die cut).  In photoshop, I drew a circle path and typed my sentiment along the path.  Then drew another path and typed a long line of dots around that path.  Next, I brought in my digi and pasted it in the middle and resized to fit.  You'll notice a small touch of his tail is sticking out over the edge.  Before I die cut the circle shape I cut around the very edge of the tail and lifted it over the metal die cut so that the tail wouldn't cut off.
Next, I printed an additional bird in the same size so I could place it on top of the first one to add a little dimension.  I colored this bird and cut out with my sharp scissors and smeared on some yellow stickles with my finger.  While the birdie was drying his feathers, I did a little stitching with some light red embroidery thread.  After sewing the pretty paper to the die cut circle card stock I glued that onto a yellow piece of card stock .  Next I punched 1 1/2" circles on white card stock and then glued my pretty paper on top of those for sturdiness.   Here is my material list:
  • Warbler Digi Stamp - TiffanyDoodles.com
  • Copics: Y08, Y15, E55
  • Yellow Stickles
  • Nestabilities Standard Circle Small
  • Paper - My Minds Eye - Bloom & Grow
  • Gina K white card stock
  • Embroidery Thread, Needle, Paper Peircer
  • 1 1/2" Circle Punch

Hope you like this card and my little yellow warbler! Check out Tiffany Doodles for more photo realistic birds and drawings.

Tuesday, May 11, 2010

Mother's Day Cards!

Everyone has gotten their cards in the mail now I can post!! =) All of these cards I made with my own Tiffany Doodles Digi Stamps!!


Related Posts with Thumbnails
 
TiffanyRichards.com ShabbyPrincess.com