 I'm a self-employed web designer & photographer since 1998. But that's all business and this blog is all about my crafty hobbies! Throughout this blog you will find things like watercolor painting, paper crafting, stamping, card-making, copics, my own hand drawn digital stamps, beading, cooking, gardening, photography, photoshop, the antics of my 4 legged children, Emma & Francie!

 Sign up with your email and I'll let you know everytime I add a new digital stamp, photo, paper craft, or painting! Don't forget to click the link inside your sign up email from Feedburner to complete the subscription!


First I will start with the materials & sizes
- For the outer pieces cut two 10"x12" I used a fun corduroy print!
- I also cut a single 10"x9" piece from the same material for the outside pocket.
- From the same material I cut a single 6.5"x7.5" piece for the inside pocket.
- Again, from the same corduroy I cut two 9"x5" pieces for the handle reinforcements.
- For the lining I cut two pieces 10"x12" from a pretty blue print!
- For the fusible fleece I cut two pieces 9.5"x11.5" for some padding!
A few other supplies and tools
- Bias Tape: 2 pieces for outer pocket 10" and inner pocket 6.5"
- At least 10" zipper
- 3 pretty buttons
- 3 pieces of decorative ribbon (to wrap around buttons)
- 2 wooden bamboo handles 4.5" D shaped
- sewing machine, thread, iron, pins, the usual stuff!

Part 1
I started by making the bamboo handle reinforcements (The two 9"x5" pieces). I started by folding them in half (right sides together) long ways and zigzag stitched the ends together.
I did this to both pieces. No need to stitch the sides b/c we need to turn them inside out.

Turn them both inside out showing the pretty material!

Next, wrap the piece around the handle, long ways, with the previous stitching on the side as shown below. Then pin and zigzag stitch along the bottom edge.

Both finished pieces will look like this!

Part 2
Next, I added the 10" yellow binding to the top of the outer pocket piece (10"x9") Pin to the 10" top edge as shown below.
Once pinned then sew along the edge like this....

Part 3
Now it's time to make the little button flowers for the outer pocket. I picked out 3 simple little shiny buttons and some decorative ribbon. I cut 3 small pieces just big enough to fit around the button. I hand sewed those pieces into a circle as show below.


After I got all 3 little floweretts sewn I decided my placement and then added the button to the center and hand sewed all 3 little button flowers in place.

And then here is what they look like sewed on! =)

Part 4
After I got the outer pocket ready, I worked on the inside pocket piece (6.5"x7.5") I folded the edges inward onto the wrong side and pinned as shown below...

After I pinned it I sewed it around all 3 pinned edges leaving the top unsewn.

On the unsewn top edge I added the piece of binding and pinned it and sewed it like this:

Next, I layed out 1 of the inner lining pieces right side up and placed (& pinned) this inside pocket on top of it in the center. Then I sewed the pocket onto the right side of the piece of lining material. When your done, it will look like this:

Part 5
Now, lets start on our outer pieces with the padding! Layout your 2 outer pieces right side down and place your fusible batting on top. Iron in place. You should have a 1/2 inch border around the edges like shown.
Next, we are going to fold down the top edge of each piece and pin down (the side that will be next to the zipper). You may have to trim off 1/2 inch of your batting like I did so that I would have room to fold the top down. The purpose of trimming off some of the batting is to reduce the bulk for when we sew it onto the zipper.

After you pin it - you can sew it down.

Here is the same piece sewn down. Do this to both outer pieces.

Part 6
Now we will attach the handles. Pin down a handle piece in the center of one of the outer pieces onto the side with the batting. As shown below.
Now, I sewed around all 4 edges and did a cross in the middle like shown below. I did this for extra stability.

Here is a look from the outside. Please ignore how my thread is bunched up in the top left. I don't know why this happens. If anyone has any tips for this beginner sewer, I'd love to hear them!

Part 7
It's coming along nicely, now we will add the zipper! If your zipper is longer than 10" trim it to fit the top edge of your bag which will be 10". Next, before you pin down the zipper, take it to the sewing machine and sew the end like this. This just secures your zipper from ever zipping in two!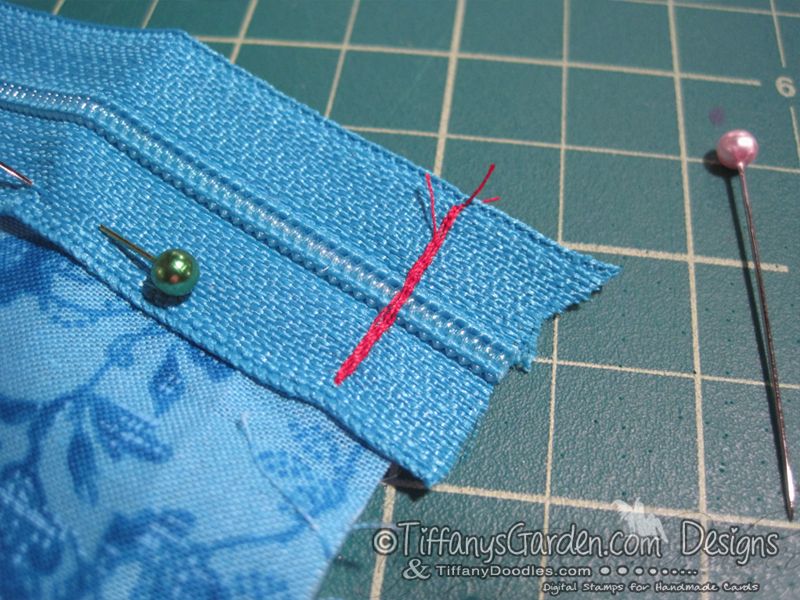
So, layout one of your lining pieces right side up. Line up your zipper on the top edge of your lining piece, leave just a smidge of the ends hanging over the edge for just in case!

This photo demonstrates what your piece would look like turned over.... no zipper showing along the top!

Part 8
Now let's attach the outer piece! Line up one of your outer pieces on the opposite side of the zipper and pin down as shown below.
I pinned as shown below so I could sew as close as possible to the handle with my zipper foot.

Then sew down that top edge as close to the zipper as you can get, about 1/8 inch or so. Then fold back lining behind the outer piece. This is what the outer piece should look like when you are done.

And this is what the lining piece should look like when you are done!! Getting closer!! =)

Part 9
Now lets attach the outer pocket. Place the outer pocket (right side up) on top of the outer piece (also right side up) like show below. Pin it down.
Then starting at the top of the pocket binding, sew around all 3 edges like below.

Here is what it will look like after you sew that piece.

Part 10
Layout your 2nd lining piece right side up and on top of that place the zipper piece you just sewed, also right side up. Line the piece up evenly. Like below.
Turn over and pin down this lining piece onto the zipper like below. In this photo you are looking at the wrong side of the lining (it just doesn't look like it).

This is where it gets a little tricky because of the bulky handles getting in the way. Turn the piece back over. Before I bring in the other outer piece I tried to pin down this handle as far back as I could to get it out of the way. There may be a better way of doing this but I sure don't know it!

Now bring in your additional outer piece and pin it down on top of the zipper as close as you can get to the center of the zipper. The handles will make this difficult, I'm just telling ya! =)

Once you get that situated, sew it down. You'll definitely be using your zipper foot on your machine to achieve this.

Part 11
Now, when layed out flat, your single piece should look like this on the outer side.
And when flipped over, the inside should look like this.

Part 12
Now, pick up your piece and bring the 2 lining pieces together back to back and the 2 outer pieces together back to back. Like below. Oh, and be sure the zipper is unzipped half way or more before you pin down.
Pin the edges down around all sides. The zipper should be folded in half towards the outer pieces. I should have taken a better pic of this part, but if you look close you can see the zipper is folded in half. The zipper teeth would be on the right side of the fold (on the lining side). Go back and forth a few times when you get to the zipper areas for stability.

Sew around all edges except the bottom edge of the lining. Go back and forth on the ends as shown below for stability when turning!

This is what it will look like after sewn up!

Next is the exciting part when you turn everything inside out and it looks like a real bag!! After you turn it, sew your liner up and you'll be done!!

 Part 13
Enjoy your new Ipad 2 sleeve! Hope you liked my first ever sewing tutorial! Ps. If you have any tips for my sloppy sewing techniques I'd love to hear them. But remember I'm a beginner and not familiar with sewing lingo!! teehee! =) Thanks for reading my sewing tutorial! Don't forget my digital stamps are on sale over at my store, Tiffany Doodles! I'm having 2 sales this month!! Check out all the super cool summer releases!