Me! Not only am I the Guest Designer, but Tiffany Doodles is also the official sponsor for this July 1 challenge! The theme is "Birds" and each of their Team Members has chosen one of my bird digi stamps to create some beautiful and inspirational cards! Be sure to check out their
blog for some inspiration!
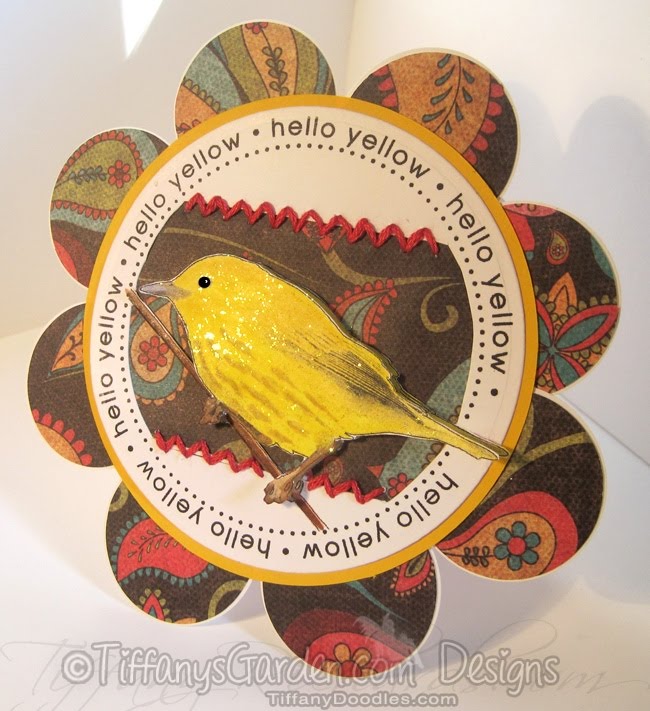
For my card I chose the
Warbler 2 stamp and colored this beautiful little guy true to life, bright yellow all over! This is a male yellow warbler and has a few brown streaks on his belly, the females have very faint brown streaks! Yellow warblers are so cute & are often mistaken for 'wild canaries'. They make a beautiful fast chipping call/song that sounds like "
sweet-sweet-sweet summer sweet". You could say I'm a bird lover/watcher, and I really enjoy photographing them. You'll find
lots of bird digi stamps at Tiffany Doodles with tons more on the way! The sentiment for my card was inspired by my trip to Bath & Body works this past weekend, they are having a "hello yellow" sale! When you walk into the store instead of saying "hello" they say "yellow". Cute.
Here are a few details about my card. I created a 3.75" square document in Photoshop b/c I planned to use my Nestabilities Die Cut (standard large circle set) to cut out a circle around the sentiment. (I used the 3.75" die cut). In photoshop, I drew a circle path and typed my sentiment along the path. Then drew another path and typed a long line of dots around that path. Next, I brought in my digi and pasted it in the middle and resized to fit. You'll notice a small touch of his tail is sticking out over the edge. Before I die cut the circle shape I cut around the very edge of the tail and lifted it over the metal die cut so that the tail wouldn't cut off.


Next, I printed an additional bird in the same size so I could place it on top of the first one to add a little dimension. I colored this bird and cut out with my sharp scissors and smeared on some yellow stickles with my finger. While the birdie was drying his feathers, I did a little stitching with some light red embroidery thread. After sewing the pretty paper to the die cut circle card stock I glued that onto a yellow piece of card stock . Next I punched 1 1/2" circles on white card stock and then glued my pretty paper on top of those for sturdiness. Here is my material list:
- Warbler Digi Stamp - TiffanyDoodles.com
- Copics: Y08, Y15, E55
- Yellow Stickles
- Nestabilities Standard Circle Small
- Paper - My Minds Eye - Bloom & Grow
- Gina K white card stock
- Embroidery Thread, Needle, Paper Peircer
- 1 1/2" Circle Punch
Hope you like this card and my little yellow warbler! Check out
Tiffany Doodles for more
photo realistic birds and drawings.


 I'm a self-employed web designer & photographer since 1998. But that's all business and this blog is all about my crafty hobbies! Throughout this blog you will find things like watercolor painting, paper crafting, stamping, card-making, copics, my own hand drawn digital stamps, beading, cooking, gardening, photography, photoshop, the antics of my 4 legged children, Emma & Francie!

 Sign up with your email and I'll let you know everytime I add a new digital stamp, photo, paper craft, or painting! Don't forget to click the link inside your sign up email from Feedburner to complete the subscription!


 I'd love to see what card you make! Please join us in this really fun challenge! Head over to Tiffany Doodles for all the details!