Tiffany's Garden Homepage Sewing Tutorials Tiffany's Garden Copics Templates Contact Tiffany
Blog Biz Cards Studio Organization Tiffany's Beading & Jewelry Gardening Watercolor Painting by Tiffany Emma and Francie Shih-Tzu

Friday, October 23, 2009

Photoshop Tutorial - Turn a photo into Line Art for a digital stamp image

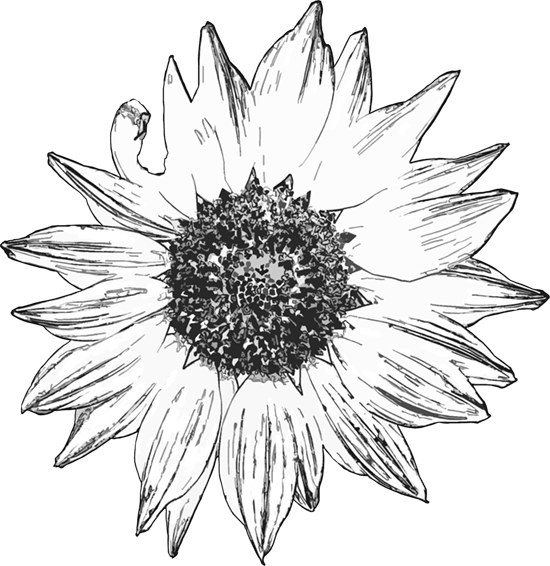
Make digital stamps (line art) from your own photographs! This is my first try at making a tutorial. I hope ya'll get some use out of it! Let me know!! =) I used one of my own images! =)

photoshop line art tutorial - BEFOREphotoshop line art tutorial - AFTER

For this tutorial I'm using Photoshop CS3, but this lesson should work with most any version b/c it uses basic tools and filters. (I'm not sure about Photoshop Elements b/c I've never used it) This tutorial can work on most any type of photo, depending on what type of digital image you want to achieve. You can either isolate an object from a photo (like below) or, use the entire photo as a "scene" for a digital stamp image.

1. Let's start by isolating your object from the background of the image. Use your pen tool to create a new work path and select your object.


If you need help using the pen tool do a google search for a pen tutorial. Depending on your image there are other ways of selecting your object; such as selecting by color range. I find it easier to zoom in really close to select your image with the pen tool. Use your space bar to pan around the image as needed. Depending on the detail of your image this step could take a while, but will be worth it in the end! Here you can see my selection path!


2. After you have selected your object (by connecting the last dot to the first dot!) Then Save Your Selection as a New Path by dragging your "new path" on the palette down to the "create new path" icon at the bottom of your Path palette. It will name itself Path 1.


3. Next, Convert Your Path to a Selection by clicking the dotted circle icon at the bottom of your palette.


4. Then go back to your layers palette and hit "cmd/ctrl J" to duplicate your selection.

Name this layer "flower". (1)

Then create a new layer below the flower layer and fill with white. (2)


5. Now, you need to desaturate your image, that means remove all the color. At the bottom of your layers palette click the New Adjustment Layer icon (the half full moon). Click "Hue/Saturation" and slide the Saturation slider all the way to the left. This will make your image look black and white.


6. Your image may seem rather flat, so lets Add Another Adjustment Layer with levels to increase the contrast. Selects "Levels".


On the levels dialogue box the left black slider represents your shadows. The right white slider are your highlights. The middle grey is for your midtones.

I moved my shadows closer in to where the shadow information starts on the scale. I did the same with the highlights moving to the left.


Look at your own image and decide what looks best.


This will make better end results with the boost in contrast.

7. Let's put this new grayscale image on it's own new layer.

Hold Cmd/Ctrl and hit your flower layer and that will automatically select what you have on that layer.

Then do a Cmd/Ctrl + Shift + C and copy merge everything that is selected.

Then do a Cmd/Ctrl + V and paste and it will automatically paste onto a new layer. Be sure it is above all other layers.

You can name this new layer: "gray flower" or whatever you would like!! Your Layer palettes should look something like this:


Okay, lets start making this thing look like a stamp!! Now the real fun begins!

8. While you are still on the "gray flower" layer apply the "Smart Blur" filter.

Filter>Blur>Smart Blur

Set the Quality to High and the Mode to Edge Only.


These are the settings I used (above). You adjust your settings to fit your own image. Watch your image as you move the sliders.


Looking cool, huh? Now let's invert the image!

9. While still on the "gray flower" layer go to Image>Adjustments>Invert


Eeewww, groovy baby!! Stay on that gray flower layer, don't leave it yet!

Now, let's apply a black stroke to the flower!

10. Click on your Layer Styles icon at the bottom of your layers palette. (fx)


I used these settings below, but you adjust for your image!


Getting closer! Now let's define the edges just a little bit more! (still on the gray flower layer).

11. Filter>Artistic>Poster Edges


Nice! Now let's go the extra mile and make it awesome!

12. Let's apply the Cutout filter: Filter>Artistic>Cutout

These were my settings but you adjust for your image!

Remember every single image you ever do will be different!


Don't worry if you see lots of jiggly lines everywhere.

You can just erase them by using a white paintbrush (on a new layer in case you mess up!)

Tweak it as much as you want to!

Finished Image:

Enjoy this image for free! Download the full size PNG here. (Right click and "save target as")

I hope you learn something from this tutorial! I'll be doing more photoshop tutorials in the near future so stay tuned to my blog!

I would LOVE to hear your feedback on this tutorial and also to see what you have done with it. It will boost my confidence to make another one!! =) **grin**

Tuesday, October 13, 2009

Memo Pad!

I made an extra memo pad for Laura! I made 3 coordinating cards and a stack of monogrammed memo papers. Again, the template is from Papertray Ink. The flower stamp on the card is by Impression Obsession from PaperGardenProjects.com


Monday, October 12, 2009

Laura's Birthday Desk Set!

I can finally post this gift set since my sister now has her birthday present!! I made her a desk set with all kinds of goodies! She loves strawberry themes so of course I used my Flourishes Strawberry set! Here is a photo of some of the items, after I took this I made more goodies (see them below!)


I bought this cardboard L from Hobby Lobby and covered with the black and white paper (by theresa collins) Added a little strawberry to the corner and colored with copics, I used my nestabilities dies, and memento ink for the stamp and around edges.


I also made a pen cup out of a short soup can, used all the same materials. I bought some round barrel ink pens and covered them with the matching paper and glue on some jewels to the tops for decoration! I also lined the inside of the cup b/c you could see inside so easily.


This was her actual birthday card, of course to match the theme! For all of the red paper throughout the set, I used the bazzil glitter paper from Paper Garden Projects! I used an EK success edger punch for the wavy edge on the red paper. I also stitched the top and bottom and added little blue seed beeds.


The tray I also bought from Hobby Lobby in the unfinished wood section. I covered it in the pretty paper, I stuck some jewels on the ends and I also added jewels on the bottom to make little "feet" for the tray. That really added a delicate touch to the tray b/c now when you set the tray down it sounds like a little "clink" instead of a wooden "clunk".... =) Little touches!!


Then I made a card set with a neat little card holder template I found at Papertray Ink in their templates section! I made 1 card to match the strawberry theme and the other cards I made to all coordinate with each other! 6 cards in all! The parts that shimmer are from Shimmerz!!


I also made a sweet 3"x3" box to match the set! I used my Just rite stamp to do the monogram piece. I put red stickles around the edges of that and stuck tiny red jewels around the red scalloped circle. I also cut out paper ribbons and embossed them with a cuttlebug embossing folder and folded them and stuck them on with a diamond brad on all 4 sides. On the inside of the box I lined with fuzzy blue thread and stamped a sweet little mouse sleeping on a cottonball. I outlined that piece with red stickles too! I decided to add little jeweled feet to this box which gave it the perfect height to allow the pretty red scalloped border on the lid. I put one in the middle for extra support!


Then finally I made a pretty little notebook! I saw one similar on a blog somewhere and can't remember where (if you know, tell me!) Anyway, it was a mini composition notebook. I covered with paper, punched holes for the ribbon, added a pen to the side that can slide out! I added an envelope like pocket on the inside cover. I added little tabs for the fun of it! This was really easy and fun!


Sorry for such a long post, but I wanted to share all the details! If you want even more details, don't be shy! Just ask!

Wood Stamp Storage

I found these 2 drawer sets on the clearance shelf at Office Max for $5 EACH!! Deal!! They hold my wood stamps perfectly!! Before I found these I wasn't sure how I was going to store my wooden stamps. But I knew I had to think of something, b/c everything has to be neat and orderly! And everything must be in it's place! Tidy tidy!! =) I didn't panic, I knew I would find something if I was patient! I love it when things work out like that!! Except now if I buy another wood stamp I'll be in pickle! Oh dear!!

Country Dirt Roads

Sometimes David and I get in his old diesel truck and just go riding around. There is something so comforting about riding down quiet dirt roads, watching nature, smelling the dirt, hearing the humming of the diesel engine. Just us. No radio. You never know what you might see! Here are 2 nice shots I snapped as we road.


Sunday, October 11, 2009

Gift Box for Granny!

My sister came to visit this weekend from DC with her new boyfriend, JK! We all liked him very much! This was the first time my sister has seen all of my "crafting" area and stuff! So I thought she should experience it a little! Since Granny's birthday is coming up on the 22nd we decided to make a simple little gift box for her! I used this easy 3"x3" box template here. Her favorite color is yellow! We stamped a cute little fawn for the inside when she opens it. I used my Just rite stamp for the center of the top of the box. We added some orange stickles around the edge and colored some white flowers with an orange copic marker to match! Of course we couldn't wait for her birthday and had to give it to her right away while Laura was in town! She really liked it! She'll be 85 this month and we are so blessed to have her!


Thursday, October 08, 2009

Chocolate covered Bacon?!?!? Yep!!

So anybody that knows David, knows how much he loves chocolate! I bought some strawberries to make his favorite chocolate covered strawberries, but I got to thinking.. I bet it would be good if I had a salty treat to dip in the chocolate!! I scanned through my pantry then the fridge, and it dawned on me... David Loves Bacon!! So I tried it! And he LOVES it!! It is surprisingly great, no, divine!! It will make your toes curl with great joy! You've got to try this at home!! Buy your semi-sweet baking chocolate and melt in a pot OVER another pot of water, stir til melted, then dip your treats! Place on wax paper and put in fridge! My guests this weekend will look at me like I'm crazy, but after they taste it, they'll find I'm not crazy at all, but pretty dang creative!!


I had so much chocolate left over and couldn't let it go to waste so I looked around for something else to drowned in chocolate!... An apple.. perfect!!

Tuesday, October 06, 2009

Gerber Daisy's colored with Copics

I love this image from Flourishes. This is from the Gerber Daisy set! I'm a huge fan of their stamps and have many of them! After my copics I added a little bit more contrast with my pencils!

Fairy Fauna w/ Copics

Here is another image. Hope it's not too blurry for you. My gold colors bled a little bit on the top flower... sorry! After blending with copics I added more contrast with colored pencils! Here are the color combos for this image.

Fresh Baked Cookies with Copics!

I colored another image with my copics. I'm in my last week of my copic class and Colleen has been a great teacher! I think my technique has significantly improved!
I colored this image and then overlayed with colored pencils and the blender. I'm anxious to try the Odorless Mineral Spirits technique as well. You can see the colors I used here. I polka dotted her blouse with a white gel pen! =)

Thursday, October 01, 2009

Beauty card!

I made this card using vellum. I embossed a brass stencil into the clear vellum then colored the back of it with colored pencils. I cut it out and placed it onto a piece of blue vellum on top of some pretty paper. I cut out the word beauty with my slice and used some metallic blue scribbles and dotted around the edges of the blue vellum. I tied the tiny bows using my bow easy!

Studio Pics!

It's always an evolving project... my organizing and such! But here is what things are looking like right now! David built me some small shelves to go into some small spaces where there was wall space! All of my art supplies make great accents for the deers and turkey that are hanging on the wall!!

This was the leftover drawer that I took out of my copic storage cubbies. I had to use it for something! I keep random ribbon is these glass jars. David is now building me a shelf for all of my ribbon rolls! Can't wait!


You can see the turkey wing hangind down in the top corner! This little shelves have really come in handy! I like to be able to see all of my tools out in the open instead of being tucked away in a storage box. It's much more convenient too!


I keep more ink pads on these little shelves below the deer! I did a quick color reference for my little versamark chalk inks. Fun!


You can also see those black ink pads on the second shelf. Those are Ranger distress inks. They don't have a side label so I stamped a little leaf in each color for a quick reference so you can see your colors when stacked! They should really consider adjusting their packaging for this reason!! ;-)


You can also see next to the little chalk ink diagram a little paper covered tin can. That was a tuna can that I covered in paper and nailed to the side of that shelf. It holds my little finger daubers and sponges! Pretty darn convenient if you ask me!


To hold all of my tiny ribbon rolls, I used this kitchen appliance. It was made to hold onions, or small fruits in a nice way on your countertop! Well, I didn't use it so much so I "converted" it to a ribbon holder!! I love finding useful ways of using useless things!! Do you have any great inventions like this? I would love to see/hear about them! The stack of index cards you see is how I catalog all of my stamps. The ones in the baskets below have not been done yet!!!! I would recommend starting this kind of project as soon as you begin collecting stamps!! B/c now it has gotten away from me and is a dreaded project!


Here is where I store all of my clear stamp sets!! By the way, these are in no particular order. Hmmmmm.... still need MORE!! Coming soon I'll show how I store my red rubber cling stamps! Stay tuned!!

My Memento Ink library!

I made this sheet as a color guide to view all of my memento ink colors! It just makes a nice quick reference for choosing colors. Plus, I love this little fawn stamp by sassafrass lass!

Related Posts with Thumbnails
 
TiffanyRichards.com ShabbyPrincess.com