Tiffany's Garden Homepage Sewing Tutorials Tiffany's Garden Copics Templates Contact Tiffany
Blog Biz Cards Studio Organization Tiffany's Beading & Jewelry Gardening Watercolor Painting by Tiffany Emma and Francie Shih-Tzu
Showing posts with label cooking. Show all posts

Sunday, February 23, 2014

DIY Deodorant

Wow, it's been so long since I've posted! Sorry bout that, life gets busy sometimes and time certainly flies by! So we have been on a DIY kick lately and after reading in so many places about how deodorants and antiperspirants are thought to "possibly" contribute to cancers, we thought we'd try some DIY deodorant and see if it works. And the only reason I'm even writing this post is to say...

IT WORKS.

Seriously, it really does!  I'm amazed and I wish I had done this years ago.  I've been using it for 3 weeks now and don't have any complaints!  Here is the recipe:

  • 1/4 cup Baking Soda
  • 1/4 cup Corn Starch
  • 5 Tablespoons Coconut Oil
  • Empty deodorant jar
The Coconut Oil does not have to be the extra virgin, expensive kind from the health food store.  (Although I do use that kind for lots of other stuff)  I picked this jar up from Walmart.  Coconut Oil can be stored in the pantry or the fridge.  76 degrees and above, it will be liquid.  76 degrees and below it will be a solid.  To make this recipe start with your coconut oil at room temp to make it easier to mix with the other ingredients.

Mix all 3 ingredients in a bowl and spoon into your empty deodorant jar.  Store in the fridge!

This amount make about 2 full size deodorant jars, or 4 of the travel size.

PS. It is easy to forget to put your deodorant on when storing it in the kitchen fridge instead of keeping it in the bathroom!!  You'll get used to it after a while! =)


Tuesday, February 07, 2012

Pink Strawberry Rice Krispie Treats

I love Rice Krispie Treats and this recipe is a little bit of a twist on something I saw on Pinterest.   For my recipe I decided to do a strawberry flavor!  You use your regular cereal box recipe and replace white marshmallows for strawberry ones!  And you add some dry strawberry cake mix and some sprinkles!

  • 6 cups rice krispies
  • 3 tbsp butter
  • 10 oz bag of strawberry marshmallows
  • 1 cup strawberry cake mix (dry)
  • sprinkles
Before you begin, spray a large cookie sheet with butter flavored cooking spray (or regular flavor).
1. melt your butter in large pot over low heat.
2. add marshmallows.

3. stir and stir til melted

4. as they start getting pretty melted add in your cake mix a spoonful at a time and stir really good.

5. notice the beautiful shade of pink.

6. add in rice krispies and keep stiring.

7. continue to stir and sprinkle in the sprinkles!

8. remove from heat, turn off stove and spread onto cookie sheet using your clean fingers!

9. YUM!

10. If you plan to cut pieces out with cookie cutters, do it quickly while it's still warm and easy to press.  Otherwise, cut into squares with a knife!

Hope you enjoy this perfect Valentine's treat!

Thursday, December 08, 2011

Red Velvet Cheesecake!


Crust:
17 Oreo cookies, crushed
1/4 cup butter, melted
1 tbsp sugar

Filling:
3 pkgs (8 oz) cream cheese, softened
1-1/2 cups sugar
1 cup (8 oz) sour cream
1/2 cup buttermilk
3 tbsp baking cocoa powder
2 tsp vanilla extract
4 eggs, lightly beaten
1 bottle (1 oz) red food coloring

Frosting:
1 pkg (3 oz) cream cheese, softened
1/4 cup butter, softened
2 cups confectioners' sugar
1 tsp vanilla extract

1. Place a greased 9-in springform pan on a double thickness of heavy duty foil (about 18 in square). Securely wrap foil around pan.

2. In a small bowl, combine the cookie crumbs, butter and sugar. Press onto the bottom of prepared pan. Tip: google ideas on materials to use on the bottom of your pan for easy removal of your cheesecake to place on you cake plate.

3. In a large bowl, beat cream cheese and sugar until smooth. Beat in the sour cream, buttermilk, cocoa and vanilla. Add eggs; beat on low speed just until combined. Stir in food coloring. Pour over crust. Place springform pan in a large baking pan; add 1 inch of hot water to this larger pan. Tip: This is called a 'water bath' and it prevents your cheesecake from splitting and cracking.

4. Bake at 325 for 60-70 minutes or until center is just set and top appears dull. Remove springform pan from water bath. Cool on a wire rack for 10 minutes. Carefully run a knife around the edge of the pan to loosen; cool 1 hour longer. Refrigerate overnight. Remove sides of pan.

5. For frosting, in a small bowl, beat cream cheese and butter until fluffy. Add confectioners' sugar and vanilla; beat until smooth. Frost top of cheesecake. Refrigerate until serving. Yield: 16 servings

Saturday, May 14, 2011

Berry Sweet!!

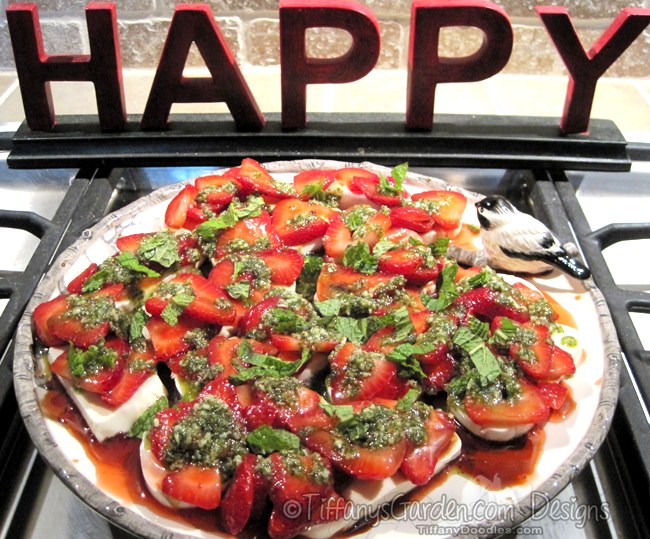
A new twist on Strawberries, Fresh Mozzarella and a yummy Mint Pesto Drizzle!!


When I saw this recipe I just had to try it! I LOVE recipes that put together items that you would NEVER have thought of... those are almost always the recipes I can't wait to try!! Like this one! I made it over this past weekend when my sister, Laura, and her boyfriend, JK came to visit. Everyone LOVED it so I thought I would share it with all of you!! =)

  • 1 lb straweberries, sliced
  • 2 tablesspoons plus 1/2 teaspoon sugar
  • 1 cup EVOO Extra Virgin Olive Oil
  • 1 cup mint leaves, loosely packed, plus extra for garnish
  • 1/4 cup almonds, sliced
  • 1/4 cup Parmesan cheese
  • 1 clove garlic
  • 1 lb fresh mozzarella cheese, 1/2" slices
  • 1 tablespoon balsamic vinegar
1. Combine strawberries and sugar in large bowl. Cover and set aside.
2. In a food processor, combine olive oil, mint leaves, almonds, Parmesan and garlic.
3. Layer mozzarella on plate. Spoon strawberries, mint pesto and balsamic vinegar over top. Garnish with mint leaves.

I added this recipe to my account over at AllRecipes.com. If you have an account there, you can add it to your recipe box and even print it out on index card layout!

Wednesday, March 09, 2011

Vintage Cookbook from Granny!

Granny gave me this sweet little cookbook yesterday while I was over there!  You can tell how much she used it just by looking at it!  I think she even left some ingredients on a few of the pages! =)  It is copyright 1947 by General Foods Corp.!  I just thought I would share a few snapshots with you today!  I just love the pink cover and the fonts they used in the design! I think it looks like a card I might make!!


Tuesday, June 15, 2010

Easy As Pie!


Literally, this is that easy!! Just open 2 things, dump 'em in and bake it.
Get 2 cans of your favorite pie filling! You choose: cherry, peach, blueberry, strawberry, or apple (David's fav)! They all sound good to me! Next, get 2 boxes of the Jiffy Yellow Cake Mix. You'll also need a couple of pats of butter.
  • 2 cans (your fav) Pie Filling
  • 2 boxes Jiffy Yellow Cake Mix
  • a few pats of butter
1. Dump your pie filling into a deep baking dish.
2. Pour dry cake mix right out of the box on top of pie filling.
3. Put a couple of pats of butter on top - spread out evenly.
By the way, don't cover with butter, it will be too rich. (tried that).
4. Bake at 350 for 45 minutes - until top is golden!
Enjoy the crunchy, crusty top with the warm fruit tucked inside! Top with Cool Whip or ICE CREAM!! I like to call this "too easy pie", it's too easy not to try!

Saturday, May 15, 2010

Fresh Strawberry Butter!


I made my own strawberry butter!! Fun & Easy! First I went and picked a small bucket from my local farmer down the road! I set out a small tub of butter to soften. I added a little brown sugar and chopped the strawberries real fine. Then stirred it all together and put in my tupperware dish! And you wanna talk about good!! Spread this over a warm piece of toast or bagel!! Oh yeah!!

Strawberry Butter Recipe:
  • 1 cup softened butter
  • 1/2 cup brown sugar
  • 1 cup fine chopped strawberries
Stir everything together then refrigerate.... TADA!!

Thursday, October 08, 2009

Chocolate covered Bacon?!?!? Yep!!

So anybody that knows David, knows how much he loves chocolate! I bought some strawberries to make his favorite chocolate covered strawberries, but I got to thinking.. I bet it would be good if I had a salty treat to dip in the chocolate!! I scanned through my pantry then the fridge, and it dawned on me... David Loves Bacon!! So I tried it! And he LOVES it!! It is surprisingly great, no, divine!! It will make your toes curl with great joy! You've got to try this at home!! Buy your semi-sweet baking chocolate and melt in a pot OVER another pot of water, stir til melted, then dip your treats! Place on wax paper and put in fridge! My guests this weekend will look at me like I'm crazy, but after they taste it, they'll find I'm not crazy at all, but pretty dang creative!!


I had so much chocolate left over and couldn't let it go to waste so I looked around for something else to drowned in chocolate!... An apple.. perfect!!

Wednesday, April 08, 2009

Cornmeal Blini Bites

Granny & Priscilla came over for lunch today! I had a surprise here for Granny ... Laura!! She came in town 2 days early and stayed with David and I. We finally got one of our guest rooms ready! (I'll take pics soon!) These cornmeal blini bites were a hit! And so easy! Everyone loved these delightful surprises!

1 8.5oz box corn muffin mix
1/2 cup milk
1 large egg, beaten
Olive Oil for shallow frying
Cream cheese (or another cheese you like)
seedless grapes, halved
Honey, for drizzling

1. Whisk the muffin mix, milk and egg together until smooth.

2. Heat a nonstick skillet over medium heat. Add 1/4 inch of oil to the pan and heat until shimmery. Working in batches, drop teaspoons of batter into the oil to make small pancakes, about 1 1/2 inches wide. Cook until bubbles appear on the tops and the bottoms are golden, 1 to 2 minutes. Flip and finish cooking, about 1 more minute.

3. Top each blini with the cheese and a grape half (or 2). Drizzle with honey and serve WARM!


Wednesday, March 18, 2009

Hoe Cakes - or Lacey Cornbread


That's how their known to most southerners. It so good and crunchy! There is a technique to get it that way! Takes practice! I studied for years under Granny!

Ingredients:
Plain yellow cornmeal
Water
Salt & Pepper

You have to get the consistency thin! Best cooked in a small iron griddle. Let your grease get pretty hot. You need to replenish your grease after every one you make. (let it get hot again!) Then pour in another hoe cake! Let it get crunchy looking and flip it! Once cooked, you can layer them out on paper towels so some of the grease comes out.

David loves to eat these for breakfast with a tall glass of milk! It reminds him of when he was a kid and his Dad would fix this for him before school.

Thursday, February 26, 2009

Just because

David had a really hard day at work today so I made him this cake while he napped! Chocolate cake, strawberry icing, and peanut butter chips on top! He wanted a piece immediatley!
Posted by Picasa
Related Posts with Thumbnails
 
TiffanyRichards.com ShabbyPrincess.com